
Many bioinformatics programs are run through a command line, rather than a graphical interface. This tutorial covers the basics of the Unix language and how to use the terminal to give commands to your computer. On a Mac, you will use the Terminal application, which is found in Applications/Utilities (or search for Terminal in your spotlight). Other systems have their own way of using a terminal but we’re going to assume you are using a Mac and, if not, that you can figure out how to do the same things on your own.
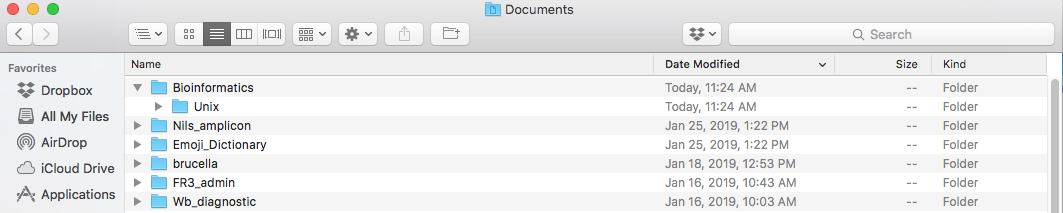
It is important to understand a tiny bit about the file structure of your computer – you have a home directory that is named for your log in name – here is a picture of my computer. My home directory is called jgrant and in it are the files Desktop, Documents, Downloads and others. Again, we are assuming you are working on a Mac – your file system might be slightly different!

If you want to work on a file, you need to give your terminal directions to that file. You can do that either by giving the terminal the complete path of your file, or tell the terminal first to look in a particular folder for the file you want. This will make more sense (I hope!) if we look at an example.
Open the Terminal app. You will see a window appear, which will have a prompt – a $ followed by the cursor. It you start typing, the characters will appear after the prompt. The dollar sign means that your computer is waiting to hear from you in the Unix language. Other prompts you might see are ‘>‘ if you are using Python or ‘@‘ if you are using mafft, but we will talk more about that later.
When I open my terminal I see this:

Notice that the $ prompt comes after the words ~ jgrant – this tells me that my terminal is pointed toward my home directory, which has the nickname ~ and that I am the user, jgrant. Your terminal will look different, and will have the ~ which denotes your home directory, and your user name just before the $. The computer I am working on is called ford205c-r10377 – as is shown before the : in the prompt.
I like keeping more of my projects organized in my Documents folder, so the first thing I want to do is tell my terminal to point to my Documents. I do this with the cd (change directory) command. In your terminal, type
cd Documents
and hit return. Because I am in my home directory, and because the folder Documents exists in my home directory, my computer knows to move into my Documents folder. If you do not have a Documents folder, or if it is somewhere other than your home directory, you will get an error. If all goes well, you will now see something like this:
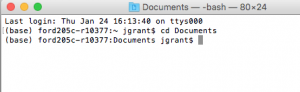
which shows that you are now in your Documents folder
cd is one of many useful commands in Unix! If you want to work on something you have just downloaded to your Downloads folder, you might cd into Downloads to do the task. You could remember where you are in relation to the Download folder – from Documents, you need to go back up to the home directory, then into Downloads. Here, a couple of shortcuts might come in handy
cd ..  Go up one

cd ~   Go home
So, you could use either of these two commands to go from the Documents folder into the Downloads folder
cd ../Downloads
or
cd ~/Downloads
Go to your terminal and use cd to point it to your Downloads folder.
There are other ways you could change into the Downloads folder. One would be to give the full path.
cd /Users/jgrant/Downloads
This starts at the very top level of your computer (look at the first image on this page) and is denoted with a forward slash. The next folder is Users, then my home directory jgrant (yours will be different) then the Downloads folder.
Wherever you are in your computer, you can cd / to get to the top level, or cd ~ to go to your home directory.
This seems like a lot of work – one cool shortcut on a Mac is dragging and dropping. Try this to get back from Downloads into Documents: Open your Documents folder in the Finder. Go back to your terminal and type cd (and a space) Then, look at the top of the finder window for your Documents folder.

With your mouse, click and hold down on the folder icon – then drag your mouse into the terminal. It should show the full path to Documents. Hit return and you should now be pointed into your Documents folder!
If you are ever unsure where you are, you can always type pwd into the terminal – this will give you the full path to wherever you’re terminal is pointed to. For example here:

I can tell by my prompt:
(base) ford205c-r10377:Iju jgrant$
that I am in a folder called Iju, but the pwd output
/Users/jgrant/Documents/Transfection/Completed_constructs/Ruby_constructs/Tpx2/Iju
tells me where that folder is in relation to the top level (/Users/jgrant…) of my computer.
————–
Now that we’ve learned a little bit about file paths, and moving around behind the scenes, let’s do some more Unix
Unix commands often have options that can make it do different things, and arguments that further refine what the command will do. Let’s look at an example.
At the prompt, type
mkdir -p Bioinformatics/Unix
Then open Documents again in your Finder and look – there should be a new folder there that you made with the Unix command mkdir!
Inside the Bioinformatics folder, is another folder called Unix.
the command is mkdir which tells unix to make a directory
the option is -p which tells the mkdir command that you are first going to make a parent directory (Bioinformatics) and a child directory (Unix).
the argument is Bioinformatics/Unix which tells mkdir what directories to make.
Now, use what you’ve learned to point your terminal into the Unix folder.