All students will receive an account for this course on the science center unix network. Your course account will have a username, 102b-xx (where the xx stands for some unique combination of two letters, as specified on the account information sheet distributed to you in class). In the instructions below, whenever you see 102b-xx you should substitute your actual account id.
We will primarily use the accounts only for hosting of web pages. Although you may work on the scinix machines using a text editor such as pico or emacs if you already know how, the help materials in this course will assume that you are working with Dreamweaver on a Windows or Macintosh computer, and uploading the results to the scinix server when finished. This document is designed to explain how to do so.
For the remainder of this document, let us imagine that you have just completed writing an HTML file that links to an image file. Save these two files somewhere on the computer where you are working, and try transferring them to aurora as though you had just written them, according to the instructions below. (On most browsers you can save a file by right-clicking or command-clicking on the link and choosing Save Link As...)
When you are done, check that you can see the page you uploaded somewhere on or through your course home page. (See the account page list for a quick link.)
Contents
Connecting via WinSCP
The college Unix system is not a single entity, but a network of individual machines that share files. We will connect to one of the computer science machines that are part of this system, called aurora. The files we place there will then be accessible to the web server, cs.smith.edu. To connect, you will need to use a secure communications tool called WinSCP, installed on the machines in FH 241. On other computers, you can either download a copy of WinSCP, or use another program (if available) called SSH. On Mac, you may use a program called Fugu. The instructions below assume you are using WinSCP, but the other programs are pretty similar.
To connect, start up WinSCP. On a lab PC, it should be under Start | All Programs | Utilities | WinSCP | WinSCP or something similar. You will see a window like the one below. Fill in the information in the Host name, User name, and Password boxes to continue, using the account name and password that were given to you.

A new window should appear with login details. If you get a message like the one below, you may click Yes. It should only appear the first time your computer connects.

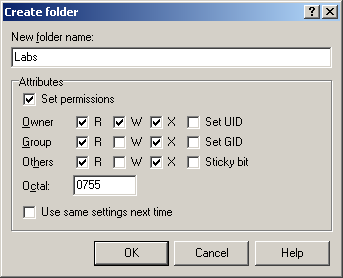
Finally the file transfer window will open. The right-hand pane represents the remote computer -- your account on aurora. You should double-click to open the public_html folder. All your web content should go in there. Within that folder you can create subfolders for your labs, homework assignments, etc. Do this by right-clicking on the right-hand pane, and selecting New... Directory. When the window below pops up, make sure you set the permissions as shown.
Transferring Files
The file transfer window is split vertically along the center. The left-hand side shows files on your local machine. The right-hand side shows files in your account on aurora. All your web files should go somewhere within the public_html folder, otherwise they will not be visible to the web server.
In the left-hand pane, find the files on your local machine that you wish to transfer. In the right-hand pane, find and open the folder where you wish the files to be placed. Now you can simply drag one or more files from left to right. You can also make other changes on either side: renaming and deleting files, for example. If you accidentally put a file in the wrong place, you should put a new copy in the proper place and delete the old copy. Try to keep your files clearly named and neatly organized; it will help you to avoid confusion about which file is which. In particular, it is usually a bad idea to keep older versions of a file around, unless they are in a folder specifically labeled as an outdated or backup copy. Otherwise I may end up grading a file that is not your completed work!
Once you have placed a file within your public_html folder, you should check that the permissions are set properly. The value in the Rights column should read rw-r--r-- for ordinary files, and rwxr-xr-x for directories. Sometimes newly transferred files will come in as rw------- and need to be changed. Right-click on the file, select Properties, and adjust the permissions to look like the ones below.

The last step in publishing a web page is to use a web browser to confirm that it is visible. So if you placed a file called example.html, try entering http://cs.smith.edu/~102a-xx/example.html in the browser location bar. Congratulations, you have just published your first web page! If for some reason the file won't show up in the browser, check that it is in the right place (inside public_html and not some subfolder) and make sure the permission settings are correct (see above; right-click and select Properties. Also, check that the capitalization of the file names matches exactly. Windows doesn't care about mismatched capitalization, but the web server runs Unix, which does care.