This lab will teach you to create tables using HTML. Tables are primarily for the presentation of grids of data. However, until the advent of style sheet positioning rules they were also widely used as a page formatting tool. This use continues to a certain extent even though style sheet positioning is preferable. Since this course will not cover style sheets, tables are the primary formatting tool available to us.
Tabular Structure
Below is a simple table, and the HTML source that created it. Note that tables are normally colorless unless otherwise specified, but I have added color to this example to show you the different parts. The coloring commands are not visible in this simple example, but we will look at them later.
| Heading 1 | Heading 2 |
|---|---|
| Data cell 1 | Data cell 2 |
| Data cell 3 | Data cell 4 |
<table>
  <tr>
    <th>Heading 1</th>
    <th>Heading 2</th>
  </tr>
  <tr>
    <td>Data cell 1</td>
    <td>Data cell 2</td>
  </tr>
  <tr>
    <td>Data cell 3</td>
    <td>Data cell 4</td>
  </tr>
</table>
Note that the cells are packaged by rows, and the rows are all packaged within the table.
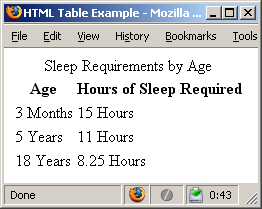
Now that you see how a table is built, try making one that looks like the image below. (Note that the first line is the table's caption.) When you are done, compare your HTML source with this.
More Advanced Tables
If you feel up for a challenge, try this more advanced exercise. Table tags have many attributes that may be included to modify the appearance of the table. Spacing, borders, and alignment of cell contents can all be specified. Style sheets, although not covered in CSC 102, also offer another method for controlling the same properties.
This exercise will focus on just a few of the more useful properties. In particular, it uses the colspan, rowspan, height, and width attributes. It also makes use of the background-color style property. The following example demonstrates the use of these tools.
<table>
<tr>
<td colspan="2"> </td>
</tr>
<tr>
<td style="background-color: fuchsia;"> </td>
<td width="100"> </td>
</tr>
</table>
Now that you have seen one example, see if you can create a table that looks like the image below. You can check your work when you are done. (Hint: this table uses a combination of all the above attributes.)
